GUI (or UI) is short for Graphical User Interface (or User Interface). It is the main interaction point between a player and the game. It consists of all of the buttons, panels and menus in the game. The NWN2 UI is fully customizable and script-able. Panel backgrounds, size, location, color and layout can all be modified.
The UI is made up of a collection of UI Scenes, which is essentially a hierarchy of panels and elements, formatted and styled using XML. The UI is defined by the ingamegui.ini file which lists all the UI Scenes with their associated .xml files. Each of these files describes a UI Scene such as the HotBar or the Character Sheet. The UI Scenes contain references to .tga files, .dds files and both internal (hard-coded) and scripted function calls.
The XML files define the UI elements such as size and position and more advanced settings and scripts to some extent. e.g:
<UIScene name="SCREEN_CHARACTER"/>
Defines a new UI Scene which can be referenced to by script under the name "SCREEN_CHARACTER" (in this case, the character statistics window).
Targa (.tga) files are images files which can be edited in most image-editing programs. The targa files consists of one layer and 4 channels, 3 channels for RGB and 1 channel for Alpha.
When drawing in an alpha channel, black represents 100% transparency, white 0% transparency, some gray colors between are half transparent.
When saving .tga files, do not save with the original name, use a new name and remember to change the association in the correct XML file too. Saving with the original name will make NWN2 load the original images, even if they have been replaced in the UI folder.
When doing UI changes, the files have to be placed in My Documents/Neverwinter Nights 2/ folder, and it's a good idea to save the original files in the /program directory.
Changes can be put in My Documents/Neverwinter Nights/UI/default, or in My Documents/Neverwinter Nights/override.
UI Elements[]
The following table lists the available elements within the NWN2 GUI.
| UI Element | Description |
|---|---|
| UI3DScene | Renders a 3D scene of the character model within the element. |
| UIButton | A simple clickable button element, mouse events can be scripted. |
| UICollapsable | Creates a collapsable panel that can be hidden or visible. |
| UIFontBold | Sub element of font family |
| UIFontBoldItalic | Sub element of font family |
| UIFontFamily | Defines a set of font properties that can be styled, parent element of the other font elements |
| UIFontItallic | Sub element of font family |
| UIFontNormal | Sub element of font family |
| UIFrame | A highlighting frame used to indicate button states etc |
| UIGrid | An element that arranges other sub-elements to a grid. |
| UIHotBarButton | This is the hotbar or quickslot button element, used to hold item and spell icons for easy access. |
| UIIcon | An icon element that will display an image, such as a spell icon. |
| UIListBox | Creates a text listbox, a list of scrollable text options in a box |
| UIPane | A flat pane which can be used as the substance for a window or object |
| UIPointLight | A lighting element used to illuminate character portrait and 3D renders in the UI |
| UIPortrait | A special element for displaying renders of the characters portrait |
| UIProgressbar | Creates a progress bar element within the UI scene |
| UIRadialNode | description |
| UIScene | This is the root element for all UI objects. |
| UIScrollbar | Defines a scrollbar for a window panel. |
| UISubNode | description |
| UIText | A text display element that can be altered dynamically by script. |
| UITextTree | Creates a tree element which can be used, as in the DM_Creator, to categorise objects or produce a hierarchical list which can be collapsed. |
HotBar Tutorial[]
This is a short tutorial on how to modify the Hot-Bar (aka Quick Slot) by increasing its length and the number of visible slots and reducing its overall size.
The XML file that defines the layout of the Hot-Bar is called hotbar.xml and can be found in your Neverwinter Nights 2 directory within the UI folders default scheme. For example:
C:Program Files\Atari\Neverwinter Nights 2\ui\default\hotbar.xml
With NWN2, custom content can be added to the My Documents directory, ..\My Documents\Neverwinter Nights 2\, this is the directory under which the new modded UI should go. For example:
C:\Documents and Settings\user_name\My Documents\Neverwinter Nights 2\ui\hotbar.xml
This will override the standard hot-bar.
Idle Expire & Live Editing[]
The first useful step when modding the UI is make sure that the UIScene has the idleexpiretime field set (about 0.5f or 1.0f), this will unload the UIScene from memory after closing the scene. This is advantageous in that changes to the XML layout can be seen immediately, while NWN2 is running, without requiring an application restart. Simply closing the Window/Scene within NWN2 and waiting for the expire time before re-opening it again will refresh the scene layout, revealing any changes.
Usually, the UIScene in hotbar.xml does not have idleexpiretime so it should be added the start of NWN2.
An easy way to force a refresh of the hotbar in-game is to go to the Menu->Game Options->Interface and unclick Show Horizontal Hotbar 1 (Default Hotbar) then Apply Changes then reclick the hotbar on, and reapply the changes.
The standard Hot-Bar[]
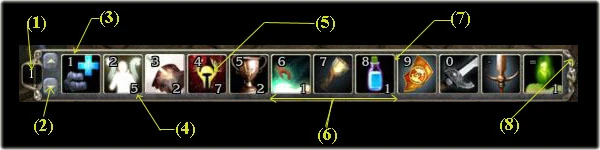
The standard un-modified NWN2 HotBar. Numbers indicate key UI elements. Click for details
The standard NWN2 hotbar is made up of a collection of UI elements. Main UI elements:
- CurrentHotbar UIText element
- GridUp1 UIButton element
- HOTBAR_TEXT UIText arranged to a UIGrid
- HOTBAR_TEXT UIText arranged to a UIGrid
- UIHotbarButton element arranged to the grid
- UIHotbarButton element arranged to the grid
- Background texture UIICon parented to the hotbar scene
Modifying the Hot-bar to contain 20 slots[]
In order to modify the hot-bar, a a few things need changing:
- The number of slots
- The width of the hot-bar field
First, the number of colums. Open up hotbar.xml with a .xml editor, such as notepad++. Look through the .xml file for element UIGrid:
<UIGrid name="HOTBAR_GRID" rows=1 columns=12 x=40 y=7 xPadding=2 yPadding=0 update=true
OnUpdate=UIGrid_OnUpdate_UpdateHotbarGrid() >
   <UIHotbarButton name="HOTBAR_BUTTON" height=40 width=40 ...
In order to extend the number of slots, simply change the value of columns to 20. The resulting line should look like:
<UIGrid name="HOTBAR_GRID" rows=1 columns=20 x=40 y=7 xPadding=2 yPadding=0 update=true
OnUpdate=UIGrid_OnUpdate_UpdateHotbarGrid() >
   <UIHotbarButton name="HOTBAR_BUTTON" height=40 width=40 ...
Now a bit of simple math to figure out how wide the hotbar field should be. Notice the second element, UIHotbarButton contains a height and width for each hotbar slot. It is square, but there is only a concern with width. The actual width might vary (maybe with screen resolution?), in this example, the width is 40. There is also a small padding on each button, xPadding, which here is 2.
The width of the field is contained in the top level element, UIScene:
<UIScene name="SCREEN_HOTBAR" OnAdd=UIScene_OnAdd_SetupHotbar("HOTBAR_GRID") x=95 y=ALIGN_BOTTOM
width=560 height=57 draggable=true priority="SCENE_INGAME"/>
To extend the width of the field, simply + the number of slots added * (the width of one slot + the padding + 1 (not sure why, but needed to make spacing right)) to the existing width.
In this example, there is an existing width of 560, added 8 slots, each slot has a width of 40, and a padding of 2 so: 560 + (8 * (40 + 2 + 1)) = 904
Therefore, the modified element should be:
<UIScene name="SCREEN_HOTBAR" OnAdd=UIScene_OnAdd_SetupHotbar("HOTBAR_GRID") x=95 y=ALIGN_BOTTOM
width=904 height=57 draggable=true priority="SCENE_INGAME"/>
Additional changes are required to make the text elements align with the bar's background texture. The fully modified XML file can be downloaded and contains comments explaining the function and layout (see available files).
The finished and extended Hotbar looks a bit like this:

Available Files[]
hotbar.xml[1] dead
Input Box Tutorial[]
This tutorial guides through the creation of a custom user interface screen. The screen is responsible for allowing the user to change their characters name. This is an illustrative example but could be easily extended for a variety of other purposes. A sample module is included that allows to ask a gnomish 'name changer' to change the name, this just shows one use of such a script and screen.
Scripting[]
GUI scripting allows to dynamically update the contents of scenes, and have scripted responses to buttons pressed. Text fields can also be used to have the user enter information which the script can process, e.g. for changing a character's name.
The Bioware forums contain a thread on GUI scripting, containing pre release information by Rich Taylor (Obsidian Lead Developer) and information figured out by the community.
The Grinning Fool has extracted a list of all tags, attributes, events and functions which can be found here.
For a practical example of using server side scripting to update elements in the UI, have a look at Cyric's compact character sheet with alignment values: [2].
Important Points[]
For a GUI to be called from a script it must be declared in the client side ingamegui.ini file in the
[MandatoryGUI]
section. This can not be acheived with an override file.
(QK's note: since patch 1.06, there's no need of using a custom .ini for UI works, so this last phrase can be avoided)
In the SceneUI Tag the attribute "scriptloadable" has to be set to "true" for manipulation of local GUI vars or text objects via script, even if the xml would not be loaded via script.
GUI callbacks can be put on UIObjects that fire off scripts on the server. What this means is a button in the GUI that fires a script every time it is clicked. Or it could made so that every time a certain window is brought up, a script is executed on the server.
Scripts can only be executed if they are named: "gui_*". If they do not start with gui_ in the name, the server will reject the request to fire the script. This will help prevent clients from firing off whatever script they want to just by knowing the name of it. It will be up to the script writers themselves to make sure that the gui_ scripts are written in such a way that clients can't abuse them by calling them whenever they want.
A few script functions exist to give some basic control over the GUI:
- Pop up a GUI Scene from nwn script
DisplayGuiScreen( oPlayer, sScreenID, bModal );
- Display a message box.
Allows to define the message text, the text for the 'okay' button, the text for the 'cancel' button, whether or not cancel is displayed, and the scripts to execute if the user clicks okay or cancel. Scripts must again be named with "gui_"
DisplayMessageBox( oPlayer, nMessageStrRef, sMessage, sOkCallback, sCancelCB, bShowCancel,
                     sScreenID, nOkStrRef, sOkString, nCancelStrRef, sCancelString );
- Determine if a specific object on a UI on that client is visible or not.
This gives script some limited control on altering the appearance of a GUI window by toggling things visible or invisible. This has the same restrictions as 'DisplayGUIScreen', in that there are some restrictions on which GUIs can be affected with this function.
SetGUIObjectHidden( oPlayer, sScreenID, sUIObjectName, bHidden );
- Close the screen on the client.
Again, there are restrictions on which GUIs can be affected with this.
CloseGUIScreen( oPlayer, sScreenID );
| Anthony Davis writes | When making or modifying a new UI/GUI, make sure you do it at 1024x768. This is our 'base' resolution. All of our scaling/resizing/repositoning is done with this in mind. Making or modifying a UI/GUI at a resolution OTHER than 1024x768 can cause some alignment and sizing issues for resolutions bigger than or smaller than 1024x768. |
Using GUI variables[]
This function is a bit more advanced in its use. But briefly, there is a set of local variables on every GUI window. The GUI layer interacts with these variables at times. And with this script function, scripts can as well. This script function can be used in combination with certain GUI callback functions.
For example, there is a GUI callback for OnUpdate that will display the contents of a local variable. Strings can appear in a custom window (or similar) in the player's GUI.
Or there is a GUI callback that will set a UI Object as 'disabled' if a local variable contains a certain value. So a certain button can be disabled on the custom screen if the local GUI variable on that screen has a certain value, and so forth.
SetLocalGUIVariable( oPlayer, sScreenID, nVarIndex, sVarValue );
From the client/UI/xml[]
- Set a local (UI) variable.
UIObject_Misc_SetLocalVarString(local:1)
- Use a local variable.
OnUpdate='UIText_OnUpdate_DisplayLocalVar(local:1)
- Send a variable to the client/UI
UIObject_Misc_ExecuteServerScript("my_script_name",local:1)
From the server/script[]
- Set a variable from the client/UI. In a script called by the UI (name starting with gui_), give the main function some parameters:
void main(string variable_name)
These parameters will be set by the UI call
UIObject_Misc_ExecuteServerScript
- Set a local variable & send to client/UI
SetLocalGUIVariable(oPC,"SCREEN_VN_ITEM_APPEARANCE_CHANGER",2,"Make changes to the item");
- Use a local variable.
Same as using a script variable once it has been received in the main function's parameters.
- Charlie's Item Appearance Changer makes extensive use of variables and might be useful to look at.